IT/모바일
제공 : 한빛 네트워크
저자 : Anghel Leonard
역자 : 김인희
원문 : Introduction to JavaFX Script
[이전 기사 보기]
JavaFX 스크립트 소개(1)
JavaFX 스크립트 소개(2)
JavaFX는 자바 코드와 손쉽게 통합이 가능하다. 다음 예제에서는 JavaFX를 사용하여 프레임에 이미지를 불러들이고 사용자가 임의로 직사각형 구간을 선택하고 저장할 수 있도록 하였다. 캡쳐와 저장 부분은 자바 코드로 구현하였다.
[예제 15]
또한, 두 개의 마우스 이벤트(마우스 클릭 – onMouseClicked, 마우스 이동 – onMouseMoved)를 사용해서 위의 프로그램과 상호작용하는 것이 가능하다는 사실에 눈여겨보자. JavaFX는 다음과 같은 마우스 이벤트들을 지원한다.
[예제 16]
[예제 17]
[예제 18]
"
}
visible: true
}

[그림 7] 예제 18 실행 결과
이 기사의 마지막 부분으로서, JavaFX로 복잡한 애니메이션을 얼마나 쉽게 만들 수 있는지 보여주는 두 예제를 소개하려 한다. 첫 번째 프로그램은 아날로그 시계를 시뮬레이션 했으며, JavaFX로 4개의 이미지가 움직이도록 했다.
[예제 19]
[그림 8] 예제 19 실행 결과
저자 : Anghel Leonard
역자 : 김인희
원문 : Introduction to JavaFX Script
[이전 기사 보기]
JavaFX 스크립트 소개(1)
JavaFX 스크립트 소개(2)
JavaFX는 자바 코드와 손쉽게 통합이 가능하다. 다음 예제에서는 JavaFX를 사용하여 프레임에 이미지를 불러들이고 사용자가 임의로 직사각형 구간을 선택하고 저장할 수 있도록 하였다. 캡쳐와 저장 부분은 자바 코드로 구현하였다.
[예제 15]
import java.io.*;
import javafx.ui.*;
import javafx.ui.canvas.*;
import javafx.ui.filter.*;
import java.awt.Robot;
import java.awt.Rectangle;
import java.awt.image.RenderedImage;
import javax.imageio.ImageIO;
import java.lang.System;
class CaptureExample extends CompositeNode{
attribute lx: Integer;
attribute ly: Integer;
operation CaptureExample();
}
attribute CaptureExample.lx = 0;
attribute CaptureExample.ly = 0;
operation saveCapture(lx_copy:Integer, ly_copy:Integer) {
var robot = new Robot();
var rect = new Rectangle (lx_copy, ly_copy, 50, 50);
var BI=robot.createScreenCapture(rect);
var file = new File(".//capture.jpg");
ImageIO.write((RenderedImage)BI, "jpg", file);
}
function CaptureExample.composeNode() =
Group{
    transform: []
    content:[ImageView {
    transform: []
    image: Image { url: ".//app//Sunset.gif" }
    cursor: DEFAULT
    onMouseClicked: operation(e:CanvasMouseEvent) {
    saveCapture(e.source.XOnScreen,e.source.YOnScreen);
    }
    onMouseMoved: operation(e:CanvasMouseEvent) {
    lx = e.x;
    ly = e.y;
    }
    },
    Rect{
    x: bind lx
    y: bind ly
    width: 50
    height:50
    strokeWidth: 1
    stroke: black
    }]
    };
Frame {
    centerOnScreen: true
    visible: true
    height: 230
    width: 300
    title: "Capture the screen..."
    onClose: operation() {System.exit(0);}
    content: ScrollPane {
    background: white
    view: Canvas {
    background: black
    cursor: DEFAULT
    content: CaptureExample
    }
   }
}
예제에서 bind 연산자를 사용한 것에 주목해보자. 이 연산자는 JavaFX에서 중요한 역할을 하는데,속성의 증분 평가(incremental evaluation)와 느린 평가(lazy evaluation)를 위해 사용된다. 이 연산자에 대한 더 자세한 내용은 JavaFX 프로그래밍 언어 문서에서 찾을 수 있다.
또한, 두 개의 마우스 이벤트(마우스 클릭 – onMouseClicked, 마우스 이동 – onMouseMoved)를 사용해서 위의 프로그램과 상호작용하는 것이 가능하다는 사실에 눈여겨보자. JavaFX는 다음과 같은 마우스 이벤트들을 지원한다.
l	onMouseClicked
l	onMouseMoved
l	onMousePressed
l	onMouseExited
l	onMouseEntered
l	onMouseReleased
l	onMouseDragged
JavaFX에서는 do later문을 사용해서 코드를 비동기적으로 실행할 수 있다.
[예제 16]
//asynchronous execution with do later statement
import java.lang.System;
var s1 = "My name is ";
var s2 = "Anghel Leonard";
    do later {
    System.out.println(s2);
    }
System.out.println(s1);

결과: My name is Anghel Leonard
JavaFX는 do문으로 특정 코드를 분리시켜 쓰레드로 실행시킬 수 있다. 이와 같은 방법으로 AWT 이벤트 디스패치 쓰레드 (Event Dispatch Thread)가 모든 이벤트를 처리할 수 있다. 다음 예제는 do문을 사용하여 무한 반복문이 있는 상태에서도 윈도우를 정상적으로 종료할 수 있다는 사실을 보여준다.
[예제 17]
Listing 16
import javafx.ui.*;
import java.lang.System;
import javafx.ui.canvas.*;
import java.util.Random;
class DoExample extends CompositeNode{
attribute randomfill: Color;
operation changeOpacity();
}
attribute DoExample.randomfill = Color{red:0 green:0 blue:0};
operation DoExample.changeOpacity() {
do{
    while(true)
    {
    var r = new Random();
    var g = r.nextInt(255);
    randomfill = Color{red:g green:g blue:g};
    }
}
}
function DoExample.composeNode() =
Group {
    transform: []
    content: [
    Text {
    x: 20
    y: 20
    content: "Because of "do" you can close this window..."
    font: Font {face: VERDANA, style: [ITALIC, BOLD], size: 20}
    fill: bind randomfill
    opacity: 0.5
    onMouseClicked: operation(e:CanvasMouseEvent) {
    changeOpacity();
    }
    }]
};
Frame {
    centerOnScreen: true
    visible: true
    height: 100
    width: 580
    title: ""Do" example..."
    onClose: operation() {System.exit(0);}
    content: ScrollPane {
    background: white
    view: Canvas {
    background: black
    cursor: DEFAULT
    content: DoExample
    }
    }
}
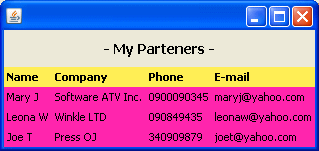
JavaFX 코드는 JavaFX의 Label 클래스를 사용해서 HTML 코드와 통합이 가능하다. Label클래스는 웹 응용프로그램과 같은 방법으로HTML과 CSS를 지원한다. 다음은 HTML 테이블을 그리는 예제이다.
[예제 18]
import javafx.ui.*;
import java.lang.System;
import javafx.ui.canvas.*;
class Partners {
    attribute name: String;
    attribute company: String;
    attribute phone: String;
    attribute e_mail: String;
    attribute partners: Partners*;
    }
    var myPartners = Partners {
    partners: [Partners{
    name: "Mary J"
    company: "Software ATV Inc."
    phone: "0900090345"
    e_mail: "maryj@yahoo.com"
    },
    Partners{
    name: "Leona W"
    company: "Winkle LTD"
    phone: "090849435"
    e_mail: "leonaw@yahoo.com"
    },
    Partners{
    name: "Joe T"
    company: "Press OJ"
    phone: "340909879"
    e_mail: "joet@yahoo.com"
    }]
    };
    Frame {
    content: Label {
    text: bind "
    - My Partners -
| Name | Company | Phone | |||||
| I have no partners... | |||||||
| {t.name} | {t.company} | {t.phone} | {t.e_mail} | ||||

[그림 7] 예제 18 실행 결과
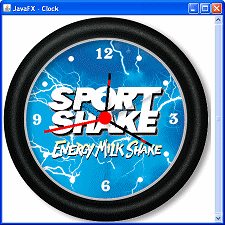
이 기사의 마지막 부분으로서, JavaFX로 복잡한 애니메이션을 얼마나 쉽게 만들 수 있는지 보여주는 두 예제를 소개하려 한다. 첫 번째 프로그램은 아날로그 시계를 시뮬레이션 했으며, JavaFX로 4개의 이미지가 움직이도록 했다.
[예제 19]
import javafx.ui.*;
import javafx.ui.canvas.*;
import javafx.ui.filter.*;
import java.lang.System;
class Clock extends CompositeNode{
attribute seconds: Number+;
attribute minutes: Number+;
attribute hours: Number+;
operation startClock();
}
attribute Clock.seconds = 360;
attribute Clock.minutes = 360;
attribute Clock.hours = 360;
operation Clock.startClock() {
do{
    while(true)
    {
    if(seconds>=360) {seconds = [0,6..360]
     dur 60000 linear;}
    if(minutes>=360) {minutes = 0; minutes = [0,6..360]
     dur 3600000 linear;}
    if(hours>=360) {hours = 0;hours = [0,6..360]
     dur 43200000 linear;}
    }
    }
}
function Clock.composeNode() =
Group {
    onMouseClicked: operation(e:CanvasMouseEvent) {
    startClock();
    }
    transform: []
    content:[ImageView {
    image: Image { url: ".//app//clockempty.gif" }
    },
ImageView {
    transform: bind [translate(203,82),
     rotate (seconds,2.5,125)]
    image: Image { url: ".//app//l1.gif" }
    antialias: true
    },
ImageView {
    transform:  bind [translate(203,100),
     rotate (minutes,2.5,107)]
    image: Image { url: ".//app//l2.gif" }
    antialias: true
    },
ImageView {
    transform:  bind [translate(203,115),
     rotate (hours,2.5,92)]
    image: Image { url: ".//app//l3.gif" }
    antialias: true
    },
Circle {
    cx: 205
    cy: 205
    radius: 13
    fill: red
    strokeWidth: 1
    }]
};
Frame {
    centerOnScreen: true
    visible: true
    height: 450
    width: 450
    title: "JavaFX - Clock"
    onClose: operation() {System.exit(0);}
    content: ScrollPane {
    background: white
    view: Canvas {
    background: black
    cursor: DEFAULT
    content: Clock
    }
    }
}

[그림 8] 예제 19 실행 결과
TAG :
이전 글 : JavaFX 스크립트 소개(2)
다음 글 : JavaFX 스크립트 소개(4)
최신 콘텐츠
